Wednesday, July 30, 2008

Escaping Unwanted Help

What a catchy title... So what am I talking about?

You know when you hit that drafting groove: youv'e got just the right mixture of coffee and donut to keep the left leg bouncing up and down while you fly through multiple drawings executing commands left and right all while humming your favorite Cake song (which of course, is Conroy) - you know that groove right?

Before I go further, it occurs to me that perhaps not everyone is familiar with Conroy... so just in case you have no clue - go get educated: http://www.cakemusic.com/songs/rarities/05ConroyFADE.mp3

Ok, we're back...

So you are in the groove, right? And then, all of a sudden, wham! You accidentaly hit the F1 key in a desperate attempt to cancel a mistyped command and you are forced to wait 3.5 seconds for AutoCAD's Help to enlighten you...

It's enough to make you switch to decaf...

Well, there is a better solution: let's turn the F1 key into an escape key!

Here are the steps:

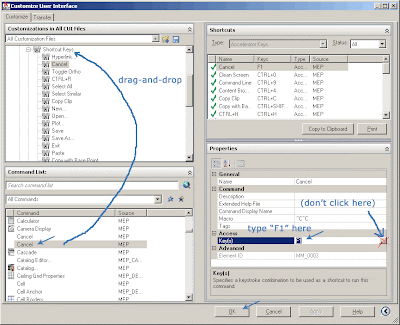
1. Command: CUI
2. In the Command List (lower left), scroll down to find the second "Cancel" (the one with ^C^C)
3. Drag-and-drop that Cancel into your Keyboard Shortcuts > Shortcut Keys
4. In the Properties area (lower-right), under Access, for Key(s), type "F1"
5. Click "OK"


Conroy on my friends... Conroy on...

Tuesday, July 29, 2008

Making mvparts "pretty"

Unfortunately, when you create mvparts in AutoCAD, there aren't a lot of options when it comes to lineweights, linetypes, colors, or plotting settings. Once the mvparts is created and inserted into a drawing, all the entities of that mvpart are the same.

In order to have mvparts include entities that are thinner, thicker, a different color, or that do not plot, we have to take some steps...

I have found that this is best accomplished after the mvpart has been completely created. To create an mvpart, you can follow the steps outlined here: http://www.geniusoftllc.com/mvparts/create.asp

Assuming the mvpart is already created, starting from a blank AutoCAD screen...

1. Open the mvpart .dwg file. For example, C:\Documents and Settings\All Users\Application Data\Autodesk\ACD-MEP 2009\enu\Aecb Catalogs\US Imperial\MvParts\Mechanical\Roof Mounted AC Units\Gas Fired.dwg

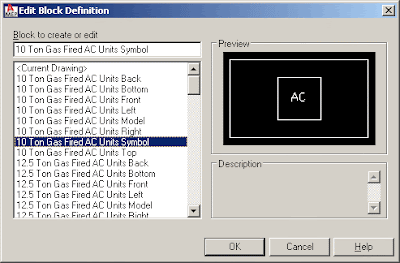
2. At the command prompt, type "BEDIT", select one of the "Symbol" blocks and click "OK" (for example, the 10 Ton unit) - the reason we edit the Symbol block is because it allows different lineweights, colors, etc.


3. Edit the block as needed to add clearance lines, hidden, lightweight lines, non-plot text, etc., save the changes and close the block editor.

4. Save and Close the Gas Fired.dwg drawing.

5. Regenerate the mvpart Catalog (command: )

6. Ensure that your display settings will show the Symbol block - to see how to do this, visit http://www.geniusoftllc.com/mvparts/videos/display.asp

7. Insert the Gas Fired mvpart and verify that the "pretty" entities are showing up.

Thursday, July 24, 2008

Flex Duct Lining & Insulation

In the recent creation of my Duct Material Schedule, I ran across a very annoying problem with the way AutoCAD MEP handles Flex Duct and regular Duct. To see my Duct Material Schedule, visit http://www.geniusoftllc.com/tools/ductmaterial.asp

The problem occurs when looking at Lining Thickness and Insulation Thickness. Duct has it, Flex Duct doesn't. Makes sense right? Well, but now click on your favorite piece of flex duct, right-click and select "Flex Duct Properties". Go to the "Lining and Insulation" tab - hmm...


So apparantly, you can set the lining and insulation thickness for flex duct, but the property set definition for them does not exist (nor can you add it).

This doesn't become a problem until you try to display properties of both Flex Duct and regular Duct in the same Schedule Table. And of course, I want to be able to display both in my Duct Material Schedule.

So how do you get around this?

First, you need to create a Formula Definition with an "On Error Resume Next" statement in it, here is an example:

On Error Resume Next
If UCase("[PartType]") = "FLEX DUCT" Then
RESULT = "N/A"
Else
RESULT = [LiningThickness]
End If

Next, you need to set the "Format" for the Property [LiningThickness] to be "Unformatted" (if you don't do this, the schedule will have errors).

Next, just save the schedule and add Flex Duct and Duct to it, verify that the formula works correctly and then go buy me a beer (http://www.geniusoftllc.com/beer4buzz) :)

Wednesday, July 23, 2008

New mvparts: Price VAV Boxes

VAV Boxes (Air Terminal Devices)

Model: Price FDC

Attached Properties:
  • Mark
  • Manufacturer
  • Model
  • Type
  • Unit Size
  • Inlet Size
  • Heating Inlet Temperature
  • Power
  • Complete With
  • Options / Accessories
  • CFM Range

For more information about these units, or to request a different mvpart, visit http://www.geniusoftllc.com/

Monday, July 21, 2008

New mvparts: Air Devices

Air Devices: Air Concepts, Krueger, Price, Titus

Models:
Attached Properties:
  • Mark
  • Service
  • Manufacturer
  • Model
  • Neck Size
  • OBD
  • Frame Style
  • Neck Style
  • Device Style
  • Complete With
  • CFM Range


For more information about these units, or to request a different mvpart, visit http://www.geniusoftllc.com/

Scheduled Images

In Air Device schedules, it can nice at times to have a representation of the air device shown for clarity. So a square cone diffuser and perforated face curved vane diffuser are easily differentiated. This may also prove useful for other objects.

To accomplish this, the use of a Graphic Definition is needed. Here are some steps to adding an image to your schedule:

1. First, create blocks of all the different images you will want to have, save them in one drawing file in a folder that is accessible from AutoCAD.

2. Start a new drawing, insert that drawing file into your drawing (to bring in those blocks). Then erase them, but don't purge them out.

3. Format > Style Manager > Drawing1.dwg > Documentation Objects > Property Set Definitions, double click on "DuctEngineeringData" (if it is not there, insert a temporary duct and then delete it, then the Property Set should be available).

4. Click on the "Add Graphic Property Definition" button, name it "AirDeviceImage", make the "Source" a Block (you could use .bmp files too, but they don't come out as clean as blocks), set the default to be *NONE*, click OK


5. Save the drawing as a Template (this way when you start new drawings, the Property Set and blocks needed are automatically part of the drawing), close

6. Start a new drawing using your new template, add a new Air Device (mvpartadd)

7. Click on the Air Device and go to properties, go to the "Extended Data" tab, under DuctEngineeringData, click on the *NONE* for AirDeviceImage

8. Change the "Block Name" to one of the blocks that you inserted into the drawing, click OK


9. Add an Air Terminal Schedule Table, right-click on it and select "Edit Schedule Table Style"

10. Go to the "Columns" tab, click on "Add Column", select the AirDeviceImage Definition from DuctEngineeringData, change the "Heading" to be "IMAGE", click OK, click OK

Here is an example schedule showing a couple different air devices with different images:

Friday, July 18, 2008

Power in Properties

It's the little things that get to us...

So you want to use the new Table Schedule Styles to display information relating to you exhaust fans, and one of the columns is for Motor Power, listing Voltage and Phase. No big deal right? Until you say that you want to show it with a dash...

  • 115/1
  • 208/3
  • 460/3

Well, this is an annoying problem.

When you create a List using Content Builder, and add these Power options to the List, any item in the List that has a "/" in it will not work. This is a problem with AutoCAD, but fear not... there is a work around.

This method of using a Formula Definition can be used in many areas. Anytime AutoCAD is not giving you what you want, give these methods a shot. If it still doesn't work, whine.

Here is a screenshot showing the MoterPower Property of an Exhaust Fan, set to the type of "List":


The first step is to get rid of those "/"s and replace them with a character that AutoCAD will except. For this example, I will use a "-". So our List becomes:

  • 115-1
  • 208-3
  • 460-3

Here is a screen shot showing the Edit List Values dialog box:


As you can see, you can input the "/"s, but once the mvpart is regenerated, it will not work. What we need to do is create a Formula that will Convert the value from a "-" to a "/".

  1. Create a new Property Definition (type: Fomula, the one with the lightning and 2+4)
  2. Name it "PowerConvert"
  3. Use an "if" statement to convert the text:
    If [MotorPower] = "115-1" Then
    RESULT = "115/1"

Here is a screenshot showing the entire formula:


Note that you could add as many power conversions as you need, just by adding more ElseIf lines. After creating this formula, and then saving the Definition, we want to insert one of the Exhaust Fans and create a schedule for it.

Here is a screenshot showing the Exahust Fan being inserted into the drawing, with the Power selected to be 208-3:


In the Schedule Table Style, when adding the Column for the power, instead of adding the Column using the Definition named "MotorPower", we want to use the Formula Definition we just created, called "PowerConvert".

Here is a screenshot showing the final outcome, with the Value correctly display with a "/" instead of a "-":

Thursday, July 17, 2008

Duct Material Schedule

I recently received a request to create a schedule that would list the amount of duct sheet metal on a job. A couple Property Set Definition creations and a little luck was all I needed to quickly create a Duct Material Schedule.

To purchase this Table Schedule Style, or to watch a video showing how the Schedule looks, visit:
http://www.geniusoftllc.com/tools/ductmaterial.asp

The schedule includes properties like:
  • Material (Galvanized, Stainless Steel 300 or 400 Series)
  • Sheet Metal Gauge (10-28)
  • System (Supply, Return, etc.)
  • Size
  • Length
  • Flex Duct Length
  • Sheet Metal Area (square feet)
  • Weight (lbs)
  • Liner Area (square feet)
  • Insulation Area (square feet)
  • Connection Type (Banded, Clipped, etc.)

Here is a quick how-to on creating the Property Set Definition for the Sheet Metal Area:

NOTE: Text shown inside of [ ] are variables and need to be added via the "Insert Property Definitions", not just typed.

First, create a new Formula Definition (named "SheetMetalArea") in the "DuctEngineeringData" Property Set (I use DuctEngineeringData so that this Property is automatically applied to the duct when the duct is inserted).

Format > Style Manager > Documentation Objects > Property Set Definitions > DuctEngineeringData, "Definition" tab, "Add Formula Property Definition" (the button that has the lightning bolt and 2+4).
Formula Definition

The formula will calculate the area of sheet metal, but in order to know which formula to use a couple "If" statements need to be used.

First, we need to check to see if the object in question is Duct or Flex Duct (because Flex Duct does not have any sheet metal, so its' area should be zero). This is accomplished by checking the value of "PartType".

If "[PartType]" = "FLEX DUCT" Then
RESULT = 0

Next, we need to check to see what shape the Duct is (Round, Rectangular, or Oval). This is accomplished by checking the value of "ConnectionShape".

ElseIf "[ConnectionShape]" = "ROUND" Then

Now we insert the formula for the area of a Round Duct:

RESULT = 3.14159 * [ConnectionDiameter] * [Length] / 144

Now for Rectangular Duct:

ElseIf "[ConnectionShape]" = "RECTANGULAR" Then
RESULT = ( 2 * [RectangularConnectionHeight] + 2 * [RectangularConnectionWidth]) *
[Length] / 144

Now for Oval Duct:

ElseIf "[ConnectionShape]" = "OVAL" Then
RESULT = ( 3.14159 * [OvalConnectionHeight] + 2 * ( [OvalConnectionWidth] - [OvalConnectionHeight] ) ) * [Length] / 144

Now end the madness:

End if

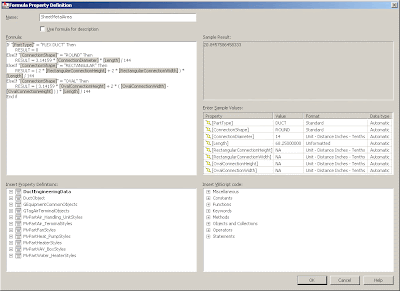
All together, the Formula should now look like this:


The next step is to change the "Format" of the Properties, here is what they should be changed to:
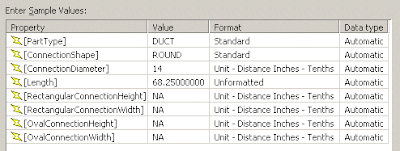
Here is an overall for the Property Set:
Wednesday, July 16, 2008

How To Create Parametric Parts

So you want to make a Parametric Part from scratch? You must be crazy. Well, here are some steps that may help you in your crazy endeavor...

Here is a video demonstrating these steps:
http://www.geniusoftllc.com/mvparts/videos/firedamper.asp

  1. Menu > CAD Manager > Content Editing > Content Builder
  2. Multi-View Part > All Installed MvParts > Mechanical > Dampers > Fire Dampers
  3. Click on “New Parametric Part”, Name: “Crazy Fire Damper”, Description: “Crazy Fire Damper”
  4. Part Configuration > Type: Damper, Sub-type: Fire Damper
  5. Change View to 3D Isometric (Command: VIEW)
  6. Modeling > Work Planes (right-click): Add Work Plane, Default
  7. Work Planes (right-click): Add Work Plane, Offset (Name: “End of Handle”), YZ Plane, 18”
  8. Draw a construction line from the top intersection of the YZ and ZX Planes to the bottom intersection of those planes
  9. Work Planes > YZ Plane (right-click): Add Geometry: Point, midpoint of the line you drew in step 8 (erase construction line)
  10. YZ Plane > Geometry > Point 2D (right-click): Fixed (check)
  11. YZ Plane (right-click): Add Profile: Circular, “node” of fixed point you created in step 9, radius: 0.5”
  12. Modeling > Modifiers (right-click): Add Extrusion, Circular profile you created in step 11, Type: Plane, “End of Handle” Plane
  13. Modeling > Work Planes > ZX Plane (right-click): Add Geometry: Reference Point, fixed point you created in step 9
  14. ZX Plane (right-click): Add Profile: Rectangular, click the corners of the rectangle such that the rectangle encloses the fixed point you created in step 9 (changing your view may be helpful)
  15. Modeling > Modifiers (right-click): Add Extrusion, Rectangular profile you created in step 14, Type: MidPlane, Distance: 6”
  16. Modeling > Work Planes > “End of Handle” Plane (right-click): Add Geometry: Reference Point, fixed point you created in step 9
  17. “End of Handle” Plane (right-click): Add Profile: Oval, click the corners of the oval such that the rectangle encloses the fixed point you created in step 9 (changing your view may be helpful)
  18. Modeling > Modifiers (right-click): Add Extrusion, Oval profile you created in step 17, Type: Blind, Distance: 0.25”
  19. Modifiers (right-click): Add Boolean Add, the three Extrusions you created in steps 12, 15, and 18
  20. Modeling > Connections (right-click): Add Connection, 1st side of Rectangular Extrusion you created in step 15, connection number: 1, click on the 2 side points created when you created the rectangular profile in step 14, click on the 2 top points created when you created the rectangular profile in step 14 (this adds the height and width dimensions for the Damper/Duct connection – which will be named RH1 and RW1)
  21. Connections (right-click): Edit Connections: change values of Domain for both connections to be Duct
  22. Modeling > Work Planes > ZX Plane (right-click): Add Dimension: Horizontal Distance, click the fixed point you created in step 9 and one of the points created by the rectangular profile you created in step 14 (this adds a dimension for the value of half the width of the Duct connection – which will be named LenA1), enter a value of 6”
  23. ZX Plane (right-click): Add Dimension: Vertical Distance, click the fixed point you created in step 9 and one of the points created by the rectangular profile you created in step 14 (this adds a dimension for the value of half the width of the Duct connection – which will be named LenA2), enter a value of 6”
  24. Modeling > Model Parameters (right-click): Edit, change the value for LenA1 to be RW1/2 and LenA2 to be RH1/2, change the value for WPOf1 to be RW1/2+8, change the values for RH1 and RW1 to be 12, change the value for RH2 to be RH1, change the value of RW2 to be RW1 (edited)
  25. Modeling > Work Planes > “End of Handle Plane” (right-click): Add Dimension: Horizontal Distance, click on the two top points created by the oval profile you created in step 18, enter a value of 6”
  26. “End of Handle Plane” (right-click): Add Dimension: Vertical Distance, click on the two side points created by the oval profile you created in step 18, enter a value of 1.5”
  27. “End of Handle” Plane (right-click): Add Dimension: Horizontal Distance, click on the reference point you created in step 16 and then the one of the points created by the oval profile you created in step 18, enter a value of 5.5”
  28. “End of Handle Plane” (right-click): Add Dimension: Vertical Distance, click on the reference point you created in step 16 and then the one of the points created by the oval profile you created in step 18, enter a value of 0.75”
  29. Size Parameters (right-click): Edit Values, click on the value for RH1 and then click on the Edit button (upper right corner), add the values as needed (3,4,5,6,8,9,10,11,12,etc.)
  30. Repeat step 29 for RW1 (edited)
  31. Change to the “Calculations” tab, click on the value for Part Size Name and then click on the Edit button, change the Precision to be 0 and enter the formula as RW1 x RH1 PrtD, click OK, click OK
  32. Click on the Options button (to the right of the stop light icon), check the boxes for “Custom Sizing” and “Break into Part” only, change the Layer Key to be M-MV-DAMPER_FIRE
  33. Click on the Save Part Family button and close the drawing.
  34. Do a dance and notify everyone in the office that you are quite possibly the most brilliant person they have ever had contact with.
  35. Go Buy Buzz a Beer

New mvparts: Mitsubishi VRF

Mitsubishi Variable Refrigerant Units

Models:

Attached Properties:

  • Manufacturer
  • Model
  • Capacity
  • Electrical
  • Weight

For more information about these units, or to request a different mvpart, visit http://www.geniusoftllc.com/

Tuesday, July 15, 2008

Customizing Duct Takeoffs

I have often been asked how to quickly modify an existing fitting to allow for more functionality. One common request is the ability to customize duct takeoffs. Here is a video demonstrating the steps needed to give the user the option to change the length of the duct takeoff.

The quick answer here is to modify the fitting to have the Type for the variable in question to be changed from Constant to List, and then modify the list to include the values the user wants to choose from.

In the video, I change the Type for "L2" (the distance from the main duct to the connection point of the takeoff.

To view the video: http://www.geniusoftllc.com/mvparts/videos/takeoffdepth.asp

Monday, July 14, 2008

Automatic Pipe Size and Length


In Fire Protection designs, it is necessary to display both the size and length of a piece of pipe. It can be quite tedious to size and dimension a large Fire Sprinkler Piping plan, so here are the steps needed to use AutoCAD MEP Property Sets and Label Curve Styles to automatically complete these tasks.

In my experience, for Fire Sprinkler Piping plans, the size of the pipe is shown above, and the length below. The size is given without the inch mark ("), with no spaces and stacked fractions. The length is also given without feet and inch marks, with a dash separation and no zero suppression. The font used for this discussion is Romans, which supports 1/4 and 1/2, but not
3/4. The codes for these are:

alt+0188 = ¼
alt+0189 = ½

For more information you can take a look at the Windows Character Map (Start > Programs > Accessories > System Tools > Character Map

Here is a depiction of what we are looking for:

Piping Depiction

What we will be doing is creating a new Template file (.dwt), which will contain the necessary Property Set Definitions and Label Curve Styles. Then we will simply use this Template file for our new drawing creation. For this discussion, we will make a copy of the "Aecb Model (US Imperial Ctb).dwt" file and save it as "GeniuSoft.dwt".

When we insert a new Pipe (Command: Pipeadd), it automatically brings in a Style named PipeStyles, with two Definitions attached: CustomData1 and SupplierName. This is the Style that we want to add our Property Sets to. The trick is that these need to be added before any Piping is brought into the drawing.


Now for some steps...

To view a video showing all these steps, visit: http://www.geniusoftllc.com/mvparts/videos/fp_pipe.asp

  1. Start a new drawing
  2. Format > Style Manager > Drawing1.dwg > Documentation Objects > Property Set Definitions > Right-click > New
  3. Name the Style "PipeStyles"
  4. Go to the "Applies To" tab, change the "Applies To" to be Styles and Definitions, then check the box for "Pipe Style"
  5. Go to the "Definition" tab, click on the "Add Automatic Property Definition" (the button that looks like a lightning bolt)
  6. Check the box for "Length", click ok
  7. Click on the "Add Automatic Property Definition" again
  8. Check the box for "Nominal Connection Diameter", click ok
  9. Click on the "Add Formula Property Definition" (lightning with 2+4 on it)
  10. Name the Definition "PipeSize" and use the Formula #1 below, click ok
  11. Click on the "Add Formula Property Definition" again
  12. Name the Definition "PipeLength" and use the Formula #2 below, click ok
  13. Click ok to exit the Style Manager
  14. Have a sip of your favorite beverage, consider buying me a beer
  15. Format > Style Manager > Drawing1.dwg > Documentation Objects > Label Curve Styles > Right-click > New
  16. Name the Style "Fire Sprinkler Pipe Size"
  17. Go to the "Label Style Annotation" tab, change "Options" to be "Use Property Set" and select "PipeStyles" and "PipeSize" from the pulldowns
  18. Change the Text Style to Romans, uncheck the box for "Mask Curve"
  19. Go to the "Label Style Offset" tab, select "Force Outside of Bounding Box" and set the "Clear Distance Offset" to be 3"
  20. Click ok to exit the Style Manager
  21. Repeat step 14
  22. Format > Style Manager > Drawing1.dwg > Documentation Objects > Label Curve Styles > Right-click > New Name the Style "Fire Sprinkler Pipe Legth"
  23. Go to the "Label Style Annotation" tab, change "Options" to be "Use Property Set" and select "PipeStyles" and "PipeLength" from the pulldowns
  24. Change the Text Style to Romans, uncheck the box for "Mask Curve"
  25. Go to the "Label Style Offset" tab, select "Force Outside of Bounding Box" and set the "Clear Distance Offset" to be 0.25"
  26. Click ok to exit the Style Manager
  27. Repeat step 14
  28. Save the Template as a new file (Command: Saveas), change File Type to Template (.dwt)
  29. Close the drawing
  30. Start a new drawing, using the template you just created, insert a pipe (Command: Pipeadd)

If all went well, your pipe should come in with Size and Length.


NOTE: For each formula, the two variables (shown in grey between [ ] ) need to be inserted via the "Insert Property Definitions" area, not just typed.

Formula #1:
D=[NominalConnectionDiameter]
If D = 1.25 Then
RESULT="1¼"
ElseIf D = 1.5 Then
RESULT="1½"
ElseIf D = 2.5 Then
RESULT="2½"
Else
RESULT=D
End If

Formula #2:

L=[Length]
If L/12-Int(L/12) > .9167 Then
RESULT=vbCrlf & vbCrlf & Int(L/12)+1 & "-0"
Else
RESULT=vbCrlf & vbCrlf & Int(L/12) & "-" & Round((L/12-Int(L/12))*12)
End If

Friday, July 11, 2008

How To Create mvparts

Want to learn how to create these mvparts yourself? It can be a little tricky and very time consuming, but if you are interesting in giving it a shot, following these instructions will hopefully save you a little time and headache.

Note: These instructions are for AutoCAD MEP 2008-2009 running on Windows XP (though they may apply to other versions of AutoCAD on other operating systems too).
  1. Create a 3D Solid model of the part(s)

  2. 3D Solid Model of mvpart
  3. Define a block for the solid model(s) you just created (Tip: name the block(s) with the Manufacturer, Model, and Size of the Part for easy differentiation)

  4. Block Definition for mvpart
  5. Click Menu > CAD Manager > Content Editing > Content Builder (Tip: If you don't have the CAD Manager Pulldown menu, click Menu > Windows > Pulldowns > CAD Manager)
  6. Select the "Multi-view Part tab" Part Catalog, browse to the correct location for you part, click on "New Block Part" (Tip: You may want to add a sub-folder to help organize your parts)
  7. Fill in the Name and Description of your part, click OK
  8. Select the type, Layer Key, and Subtype for your part, click Next
  9. Click on the "Add part size" button, select each block you created (Tip: Select the blocks in order of Size)
  10. Click on the "Generate Blocks" button, click on the "All Directions" button, click OK, click Next

  11. Generating Blocks for mvpart
  12. Either select a previously drawn image for your part or generate one from an Isometric view, click Next (Tip: A simple google image search for the part is helpful, resize the part to be 200px by 200px)
  13. Right-click on the Part Name and select "Add ___ Connector", specify the Name, Flow Direction, Shape, etc. for the connection, click OK
  14. Right-click on the connection(s) you made and select "Edit Placement"

  15. Adding Connectors for mvpart
  16. Modify the Position (P) and Normal (N) for each connection you made
  17. Specify the Size(s) and Connection Type(s) for each connection, click OK, click Next

  18. Place Connectors for mvpart
  19. Click on the "Edit Properties" button
  20. Click on the "New" button, select "Custom Data 1", specify name of property, click OK
  21. Modify the Description, Data Storage, Data Type, Units, and Visibility for each property you create

  22. mvpart Parameters
  23. Change to the "Values" Database, modify the values for each property you created that has a "Constant", "List", or "Table" Data Storage
  24. Change to the "Calculations" Database, modify the calculations for each property you created that has a "Calculation" Data Storage, click OK, click Finish

  25. mvpart Parameter Values
  26. Insert your new mvpart and verify all is working correctly